Quantcast
Channel: MS Israel Community |הבלוגייה - Global Tag Feed For : itpro
Viewing all 717 articles
Browse latest View live

PXE error 0xc0000098 post upgrading SCCM

$
0
0
Hey folks, Unfortunately recently many IT guys experiencing screwed boot image issues after upgrading their System Center to a newest SCCM versions such as 1706, 1709, 1710. The main issue is that after upgrading the SCCM to newest version, for some reason the boot PXE stopped from working and you get the following while pressing F12 PXE error "0xc0000098", didn't make sense why it happens, holding your head and going to spend lot of hours of troubleshooting , I have seen different scenarios of this issue, the major one was that the upgrade operation has been added two new boot images wihtout our awareing, with different ID, without any necessary settings like "Deploy this boot image from the PXE-Enabled distribution point". By the way, according to my internal, they are corrupted and following these issues you can realize that it's stopping you from running task sequences and working with boot images. According to Google results, you might re-install the WSUS, DP, MP, made many changes which aren't needed really. I do suggest you verify everything, go over the DHCP options, DP, Task Sequence, MP, PXE. In order to solve this, you should only re-create the boot images from the beginning for  x64 & x86 architectures, Don't forget to deploy both even if only one is needed The tricky thing is that you can't create new Boot image without MDT integration, and I guess that you are trying to upload the "WIN file" from Windows ISO and it still doesn't work, therefore the operation you should do is the download MDT integration and integrate it into your SCCM.
  • don't forget, after recreating the new boot images, make sure the TS uses the correct boot image, distribute content, update DP's, Deploy this boot image from the PXE-Enabled distribution point, drivers and centra and centra.
You can download this from the following URL: https://technet.microsoft.com/en-us/windows/dn475741.aspx?f=255&MSPPError=-2147217396 The error: Image result for PXE error 0xc0000098    

Office 365 Migration options

$
0
0

Office 365 Migration options:

Hey guys, hope you are doing well, this article going to be interesting! Long time I wanted to introduce you the Office 365 migration options, Recently, I had many Exchange and Office 365 migration projects to complete, a roughly 3-4 project that I have to manage and lead, each one is different and more challenged, I really love doing this type of project!!! it requires preparation, design, implementation and project manager skills, therefore I would like to talk little about them and show you which migration options do we can initiate using Office 365 migration built-in options.

There have four migration options:

  • Remote move migration (supported by Exchange Server 2010 and later versions)
  • Staged migration (supported by Exchange Server 2003 and Exchange Server 2007 only)
  • Cutover migration (supported by Exchange Server 2003 and later versions)
  • IMAP migration (supported by Exchange and other email systems)

I want to concentrate on 3 major migration options:

  • Remote move migration (supported by Exchange Server 2010 and later versions)
  • Cutover migration (supported by Exchange Server 2003 and later versions)
  • IMAP migration (supported by Exchange and other email systems)
As we usually saying, "let’s talk business and touching them" Remote move migration (supported by Exchange Server 2010 and later versions): This mode allows us to migrate on-premises Exchange mailboxes to Office 365 and work at the same time on both sides. You can still work in the on-premises Exchange and receives emails, you can migrate mailboxes to office 365 and receives emails over there as well ,this method is the preferred to an organization that planning to move into office 365 services, Because you can do it in your leisure time and according to selection, without pressure, try to think about it, you decide which mailbox to migrate or not. Usually, we migrate about 10-20 mailboxes at the same time and as soon as the migrate finish the user gets a message that the "The Microsoft Exchange Administrator has made a change that requires you quit and restart Outlook" and you have to re-open the outlook and then the user should enter his credential which is must be matching to Office 365 UPN. What are the prerequires and important points to work in the Hybrid mode?
  • Make sure you have a trusted certificate, not from your CA, you should purchase - Make sure Autodiscover URL is included your certificate’s URL
  • Make sure your Autodiscover and you exchange records are published over Wide World DNS and points to Exchange.
  • If the exchange's name like (pelegit.local), you have to change Exchange URL’s that users will authenticate with Exchange/EWS services externally and then the users won’t get certificate warning like this:

  • If your UPN is different than the domain you added to office 365 please open "Active Directory Trust and Domain" and add the correct UPN.
  • You should change the UPN to the intended mailboxes that supposed to be migrated to Office 365:

  • If your SMTP address contains like “Meirp@pelegit.local” you have to remove it and also to remove the domain from "Email Address Policy": You also can check the "ProxyAddresses attribute" in the "ADSIEDIT" and check that there is no wrong SMTP address.

  • You also can uncheck the "V" option of “Automatically update e-mail address based on e-mail address policy” per a mailbox, or run this command using "Exchange PowerShell" and it unchecks the checkbox from all mailboxes. Get-Mailbox | Set-mailbox -EmailAddressPolicyEnabled $false
  • Make sure you are not syncing the wrong SMTP address, for example if your domain UPN is Meirp@Pelegit.local as you can realize that this domain isn’t valid in  the "Accepted Domain" on Office 365 ,thereby you must remove irrelevant SMTP address from all mailboxes, you can’t sync unexciting SMTP that isn’t valid in your accepted domain, I on purpose emphasize it because many migrations failed due to this issue.
  • How to remove wrong (%UserName%@Pelegit.local) SMTP address from all mailboxes:
    $users = Get-Mailbox -ResultSize unlimited
    foreach ($user in $users) {
    
        $email = (Get-Mailbox $user.alias).EmailAddresses | Where-Object {$_.ProxyAddressString -like '*pelegit.local'}
    Set-Mailbox $user.alias -EmailAddresses @{remove="$($email.smtpaddress)"} }
  • Add domains to Office 365 and don’t change AutoDiscover and MX records yet - Just verification process.
  • Enable office 365 trial license from licenses – you may wait up to an hour that all Admin center appears.
  • As soon as you finish with your On-premise prerequires you can download the Download the AD Connect from the following URL: (SBS2011, Windows Server 2008, Windows Server 2008 R2, Windows Server 2012, Windows Server 2012 R2, Windows Server 2016) -- https://www.microsoft.com/en-us/download/confirmation.aspx?id=47594.
  • Use of "Global Administrator" credential in order to connect to office 365.
  • Sync the contacts, group, distributions groups.
  • Before installing the Hybrid configuration you should verify that your exchange is ready for migration process by check that "MRSH service" is up and check the following points:
  • Check the MRSHealth using the following command: "Test-MRSHealth"
  • Make sure the MSRProxy is enabled using the following PowerShell on Exchange Shell:
    Set-WebServicesVirtualDirectory -Identity "EWS (Default Web Site)" -MRSProxyEnabled $true -MRSProxyMaxConnections 50
  • Make sure the Basic Authentication is enabled:
  • Open the IIS and open the “EWS” folder and make sure the "Basic Authentication" is enabled
  • Make sure you are able to access the following URL Externally https://mail.xxx.co.il/ews/mrsproxy.svc
  • Go to Exchange Management under Admin Center and click on Hybrid button
  • Using the End-point you can see the on-premises environment data.
New Hybrid configuration wizard prompted - Ensure the A/V is not blocking the wizard, otherwise, exclude some sources. - Make sure the AD connect and Hybrid configuration is opening to MS service using 443 and 80. Running the hybrid wizard, it is not complicated at all, just make sure you understand everything you are donning and don’t continue without understanding the small things.

Hybrid configuration creates the connectors (Send/Receive), certificates, email address policy, federation trust, hybrid configuration, organization relationship, onmicrosoft SMTP address and some settings that help to route the email and data to Send / Receive an email to office 365 in the hybrid mode.
  • Sending email to meirp@mscloudmailbox.com > MX  > SMG \PINAPP\Proof Point > Exchange > verifying if exist or not > forward email to Office
Exchange checks if this mailbox is existing in the on-premises environment or not, the mail goes to cloud according to "Routing E-mail Address":

How does migration process look like? Here is an example of a batch file with two mailboxes that migrating to Office 365:

If you see larger size than the original mailbox size -  don't worry it is ok, don’t work up, it is normal, migrate process adds some temporary data on the mailbox which helps them migrate mailbox.

Cutover migration (supported by Exchange Server 2003 and later versions):

This migration method is a common one as well, we migrate all mailboxes at once time, let me describe: When we have a small organization with 50 mailboxes which is small env, we can migrate all of the mailboxes from a source email system to Office 365 at one click, when you run this sync it doesn’t mean that you cutting over the mailboxes, you can re-run the delta whenever you want, just whenever you decide to change the DNS at the specific time, you can re-run the batch again as last incremental action and then change the MX and DNS record to point Microsoft services. You have to take into your consideration that after this process you have to reconnect all user's accounts to office 365 services and mobiles as well, their accounts were connecting to the old mail server. Important notes:
  • Microsoft allows you use this method only if your on-premises Exchange organization has fewer than 2,000 mailboxes.
  • Make sure the Outlook Anywhere is enabled.
  • You can’t use cutover migration when DirSync is enabled, you must stop the DirSync, therefore, you can create all source mailboxes as objects in your Active Directory, with the same UPN. and SMTP address and don’t run DirSync yet!
  • Exchange Online mailboxes are synchronized every 24 hours, or you can re-run it manually.
  • At the period of delta time, any deleted item in the on-premises environment will sync to exchange online as well.
  • You must create end-point with administer account that has full permissions to all mailboxes in the source environment
  • Autodiscover and you exchange records are required.
  • You have to add the Domain to office 365 accepted domains as well.
  • You have to verify that there is no any existing UPN, member, contact, groups, a user that already exists in Office 365, if it’s one of these objects existing, the migration process will be failed about existing object with the following error messages: Error: UnexpectedTargetRecipientTypeException: An unexpected recipient of type ‎'Mailbox‎' already exists in the target environment. Expected a recipient of type ‎'Group‎'.Error: MigrationProvisioningPermanentException: The name "PelegIT" is already being used. Please try another name. --> The name "Pelegit" is already being used. Please try another name.
  • Cutover Migration creates the mailboxes and users without licenses, at the end of the migration you should assign a license.
  • You can turn on DirSync again, afterward, you should see that your object syncs with your on-premises Active Directory.
  • Change DNS record to Office 365 and completed domain verification.
  • The annoying thing is the reconnect all mobiles and computer to office 365.
The cut-over migration runes in these steps: > Verification > Provisioning-Updating > Syncing Cutover example:

Do not forget deleting the batch at the end of the process. Guys please don't forget change DNS record and points them to Office 365.

IMAP migration (supported by Exchange and other email systems):

IMAP migration is another great way to migrate mailbox from mail system and you don’t have full permission for all mailboxes. IMAP migration allows us to migrate mailboxes using end user credential - email address and password. - You should create users in your office 365 and assign license before starting IMAP migration, regarding the password, it mustn’t be like source, you can to set a password to each user later on.
  • Only items in a user's inbox or other mail folders are migrated. Contacts, calendar items, or tasks aren't migrated.
  • The term for this is to create end-point as well as source exchange details.
  • You have to add your domain to Office 365.

You have to upload CSV file with the following columns > 'username, email address, and password', exactly the following structure:

After you completed the wizard with next button, you will be able to trace the migration progress:

The only problem I experience post this migration is that some irrelevant folders have created on the migrated mailbox:

However, it is migrating email items perfectly and you can use this option without purchasing any third-party software, it suites to migrate from email system which is based MS, although it supports exchanges server as well. By the way, you can do the same migration from the different location in Office 365 Admin center: Setup > Data Migration >

And here you have to provide "Administrator credential":

After that, just specify the user’s password in the source environment: - Clickable users are licensed users.

Also here you can resync the mailbox items whenever you want, like the cutover migration. The major difference is that here you must enter the user's source password. As soon as you complete the migration you, can change the DNS records and points them to Office 365 services. As you can see guys, we have different options to move into Office 365 service, a third-party solution can do the provide us the same solution (the common are MIGRATIONWIZ and kernel migrator). It was important to me sharing the migration options and enrich your knowledge with regards to office 365 migration subjects. I strongly recommend before initiating and moving to the office 365, check anything thoroughly, and don't miss small important notes, you simply can screw up the user's basic services due to the incorrect configuration, therefore, verify your autodiscovery is working well using this website: https://testconnectivity.microsoft.com/ For any question and further information please don't hesitate to leave a comment.    

Group Policy Internet Explorer Security Zones

$
0
0
Group Policy Preferences Registry Items Create a new Group Policy Object and browse to User Configuration -> Preferences -> Windows Settings and Registry. Right click and choose new Registry Item. This is where you’re configure the sites, you will need 1 registry item per site Key path format is as follows: Software\Microsoft\Windows\CurrentVersion\Internet Settings\ZoneMap\Domains\yshvili.com Value name will typically be http or https Value type is REG_DWORD Value Data uses the same as Site to Zone Assignment 1 for Intranet Zone 2 for Trusted Sites 3 for Internet Zone and 4 for Restricted Sites Zone Done

Offline install of .NET Framework 3.5 in Windows 10 using DISM

$
0
0
install .NET Framework 3.5 in Windows 10 Insert your Windows 10 DVD or double click its ISO image or insert your bookable flash drive with Windows 10 depending on what you have Now start run type cmd and type the following command Dism /online /enable-feature /featurename:NetFX3 /All /Source:D:\sources\sxs /LimitAccess End Enter Done  

Mail-enabled public folders not receiving external mail

$
0
0
Add-PublicFolderClientPermission -Identity “\shidorim” -User “Anonymous” -AccessRights CreateItems

Announcing New information protection capabilities across devices, apps, on-premises and the cloud

Detecting Kerberoasting activity using Azure Security Center

Controlling Automated Renew Requests Generation Time in FIM CM/ILM 2007 CLM /MIM

$
0
0

Abstract:

CLM in all of its versions has a mechanism to auto initiate Renew certificate Requests when the certificate is about to expire .

This article will explain how this mechanism works and how to better control it, for instance in a case where there are a lot of certificates that will require an update at a particular date and there is a need to update them in batches instead of all together.

In this article:

· General explanation on how the Auto Renewal mechanism works

· Method To control the Automated Renew Process

· Navigate the CLM DB to Find expiring certificates request id's and more

How the Auto Renewal mechanism works:

· At the profile template - either in the renew policy or the online update policy the OTP definition is comprised of 4 positions for example 2,8,30,30

o number of OTPS – in the example there will be 2 OTPS

o length of each OTP – in the example each OTP will comprise of 8 characters

o when the certificate is in expiry period (when the renew \online update request will be generated) – in the example 30 days before the certificate expire date a renew request will be generated

o validity period of the OTP – in the example the OTP will be valid for 30 days

this is described here: https://social.technet.microsoft.com/Forums/en-US/12128753-b443-49d4-a4a3-9881ddc02cec/fim-cm-default-password-provider-settings?forum=ilm2

· when a certificate is enrolled those definitions are calculated (changing the profile template will not affect old certificates) and the designated renew request generation date is inserted into the database (table – Certificates –column cert_renew)

· the ClmService (it has different names thru the different versions for fim cm it is called "Forefront Identity Manager CM Update Service") goes thru that table and for each certificate that has a cert_renew date older than the current time the service create a renew/update request this happens only once per certificate – the Service Does this by default every 5 hours or at a service restart this configurable as described here : https://technet.microsoft.com/en-us/library/ee534907(v=ws.10).aspx#BKMK_ConfigureRenewalRequests

How To control the Automated Renew Process

· change the cert_renew column for the relevant certificate (if changed to any point at the past the service will create a renew request) – this can only work once per certificate

for example the sql query:

UPDATE [CLM].[dbo].[Certificates]SET [cert_renew]=dateadd(dd,-1,getdate())where cert_issued_serial_number='certserialnumber'

Replace certserialnumber with the relevant certificate serial number

a similar process is described here https://technet.microsoft.com/en-us/library/ee534907(v=ws.10).aspx

· if the otp is still valid and there is a need to notify the user again ,you can http post to the CLM website to redistribute (resend the mail with the OTP) for instance in powershell (version 4 and above):

Invoke-WebRequest -Uri "https://clmserver/Clm/content/common/requests/DisplayRequestStatus.aspx?ID=$($uuid)" -Method Post –UseDefaultCredentials

$uuid – is the request UUID for the renew request in the DB

· create automated renew requests using the SQL API – the SQL API Reference is here : https://msdn.microsoft.com/en-us/library/windows/desktop/bb468093(v=vs.100).aspx . there are 2 store procedures relevant for the renewal request creation ,one for renew https://msdn.microsoft.com/en-us/library/windows/desktop/bb468071(v=vs.100).aspx , and one for online update https://msdn.microsoft.com/en-us/library/windows/desktop/bb468088(v=vs.100).aspx for example this is how to call the online update Store Procedure (the renew works the same only the Store procedure name is changed):

DECLARE @request_uuid uniqueidentifier

EXEC [dbo].[externalSubmitOnlineUpdateRequest]

@serial = N'smartcard manufacturer:{Smart card serialnumber}',

@reason = 0,

@template_oid = NULL,

@registration_data = NULL,

@comments = N'test',

@request_uuid = @request_uuid OUTPUT,

@request_priority = NULL

SELECT @request_uuid as N'@request_uuid'

The SP require you know 2 parameters of the renewd smart card manufacturer and it's serial number.

The SP creates a new line at a table called ExternalRequests The CLM Service is going thru that table (at its regular interval) and open request for the new lines at that table when it does it sets the column er_submitted_fl to 1 if the service was unable to create a request there will be an error code at the er_error_number column (instead of 0 which is an operation successful code)

Finding Useful Data in the Clm DB

General:

· all the dates in the DB are in UTC

Relevant tables:

Smartcards table: Contains all the data FIM has on SmartCards , each row represents a smartcard. examples to some of fields in that table :

· sc_uuid – the primary key of the table that exists as a foreign key at other tables

· sc_serial_number – the smart car serial number

· sc_manufacturer_id – the manufacturer id (usually a name like aladin/athena/ MSBaseCSP and such)

· sc_status – the state of the smartcard (2 for active ,5 retired etc)

Certificates Table: Contains all the Certificates issued by FIM CM each row represents a Certificate. examples to some of fields in that table :

· cert_id - the primary key of the table

· cert_request_revoked_when – the date when a revoke request happened (if the certificate is not revoked this should be null

· cert_issued_certificate_hash – the certificate hash

· cert_issued_serial_number – the certificate Serialnumber

· cert_not_before – the certificate vaild from date

· cert_not_after – the certificate expiration date

· cert_user_uuid – a foreign key to the UserNameCache that translate to a user name

· cert_renew – the date when the clmservice will create a renew request

ProfileCertificates table: contains a translation from the profiles table(profile_uuid column) to the certificates table cert_id Primary key

Profiles table: this table connects between most of the other tables in the db. Every row in that table represents a Certificate connection to a smart card (if a smart card has 2 certificates in it, it will have 2 rows),examples to some of fields in that table:

· pr_status - represents if the SC is active or revoked (2 represents active)

· pr_current_fl – represents if this is the latest profile in a case when a smartcard being reused old profiles will be marked as 0 and the active profile will be marked with 1

· pr_sc_uuid – a Foreign key to the smartcard table

· pr_assigned_user_uuid - a Foreign key to the UserNameCache table

· profile_uuid – a Foreign key to the ProfileCertificates which in turn has a Foreign key to the certificates table

Requests table : Contains all the requests in the system and their state, examples to some of fields in that table

· request_uuid – the primary key of the table

· req_type – code that represents the type of request for example

o 1 – enroll

o 2- Recover

o 3 - renew

o 4 - disable

o 5 - online unblock

o 6 – duplicate

o 7 - retire

o 10 - online update

o 14 – offline unblock

· req_submitted_dt – the utc date when the request was created

· eq_completed_dt – the completion date of the request (if null then the request is open )

· req_sc_uuid – foreign key to the smartcards table

· req_profile_uuid - foreign key to the profile table (null before completion )

· req_target_user_uuid – the user the request is assigned to

ExternalRequests table: Contains all the external Requests opened with the Store Procedure , examples to some of fields in that table

· external_request_uuid – primary key of the table

· er_created_dt – the date the External request was created

· er_submitted_fl – 0 if the service still hasn’t processed that External request, 1 if it did

· er_req_request_uuid – a foreign key to the requests table (after the service processed the external request and created a real request)

· er_sc_serial – the manufacturer id + smartcard serial as supplied in the external request creation (can be crossed referenced with the smartcards table)

· er_error_number – after the service processed the external request if the real request generation succeeded it wiil contain 0 all other values represents an issue at the real request creation proccess

· er_error_data – an explanation of the issue in the real request generation

useful queries:

get all smart cards expiring in a certain date

SELECT unc.unc_user_nt4_name

,sc.sc_manufacturer_id

,sc.sc_serial_number

,c.cert_not_after

,c.cert_renew

FROM [CLM].[dbo].[Profiles] p

left join [CLM].[dbo].[SmartCards] sc on p.pr_sc_uuid=sc.sc_uuid

left join [CLM].[dbo].[UserNameCache] unc on p.pr_assigned_user_uuid =unc.unc_user_uuid

left join [CLM].[dbo].[ProfileCertificates] pc on pc.pc_profile_uuid = p.profile_uuid

left join [CLM].[dbo].[Certificates] c on pc.pc_cert_id =c.cert_id

where

convert(date,c.cert_not_after) = '2010.01.01' and sc.sc_status =2 and c.[cert_request_revoked_when] is null and p.pr_status=2 and p.pr_current_fl=1

open external requests for all Smart cards in return from this query

/****** Script for SelectTopNRows command from SSMS ******/

use clm

go

declare @scid nvarchar(300)

declare @unc_user_nt4_name nvarchar(80)

declare @sc_manufacturer_id varchar(50)

declare @sc_serial_number uniqueidentifier

declare @cert_not_after datetime

declare @cert_renew datetime

declare @cert_issued_serial_number varchar(128)

declare SC_cursor cursor for

SELECT unc.unc_user_nt4_name

,sc.sc_manufacturer_id

,sc.sc_serial_number

,c.cert_not_after

,c.cert_renew

,c.cert_issued_serial_number

FROM [CLM].[dbo].[Profiles] p

left join [CLM].[dbo].[SmartCards] sc on p.pr_sc_uuid=sc.sc_uuid

left join [CLM].[dbo].[UserNameCache] unc on p.pr_assigned_user_uuid =unc.unc_user_uuid

left join [CLM].[dbo].[ProfileCertificates] pc on pc.pc_profile_uuid = p.profile_uuid

left join [CLM].[dbo].[Certificates] c on pc.pc_cert_id =c.cert_id

where

convert(date,c.cert_not_after) = '2010-01-01' and sc.sc_status =2 and c.[cert_request_revoked_when] is null and p.pr_status=2 and p.pr_current_fl=1

open sc_cursor

fetch next from sc_cursor into @unc_user_nt4_name,@sc_manufacturer_id,@sc_serial_number,@cert_not_after,@cert_renew,@cert_issued_serial_number

while @@FETCH_STATUS = 0

begin

print @unc_user_nt4_name

set @scid= @sc_manufacturer_id+':{'+convert(nvarchar(200),@sc_serial_number)+'}'

EXEC [dbo].[externalSubmitOnlineUpdateRequest]

@serial = @scid,

@reason = 0,

@template_oid = NULL,

@registration_data = NULL,

@comments =@unc_user_nt4_name,

@request_uuid = @request_uuid OUTPUT,

@request_priority = NULL

fetch next from sc_cursor into @unc_user_nt4_name,@sc_manufacturer_id,@sc_serial_number,@cert_not_after,@cert_renew,@cert_issued_serial_number

end

close sc_cursor

deallocate sc_cursor

SAGI  U.  & SHMUEL H.


Add a new Datastore VMware

$
0
0
Hey there, Today I would like to show you how to add new datastores to VMware infrastructures easily and quickly keep on your name conventions, ID orders, best practice! My VMware version is 6 which is still done through VSphere. As known database can create on a different type of physical storage - local storage, iSCSI, Fibre Channel SAN, and NFS. I already created a new Volume on my storage and the only task I have to do is adding this new volume to my VMware. So in my case I have several (ESX) Hosts, I can perform "rescan for databases" on each host or I can rescan it per "Cluster" which consists all hosts and that's what I am going to do -  quicker and better. Please "Right click" on Cluster and "Rescan for databases":

As you can notice some new tasks created which regard to rescan all HBAs:

As soon as the tasks completed go to your Host and add the new Datastore: Host > Configuration Tab > Storage> Add storage

  Select the storage type, in our case; it goes to be ISCSI Lun:

Here is our Volume:

State a name:

Set a capacity:

You can verify the 'LUN ID' and capacity on your iSCSI device:

  And that's all, the Volume is ready for use.

PXE error 0xc0000098 post upgrading SCCM

$
0
0
Hey folks, Unfortunately recently many IT guys experiencing screwed boot image issues after upgrading their System Center to a newest SCCM versions such as 1706, 1709, 1710. The main issue is that after upgrading the SCCM to newest version, for some reason the boot PXE stopped from working and you get the following while pressing F12 PXE error "0xc0000098", didn't make sense why it happens, holding your head and going to spend lot of hours of troubleshooting , I have seen different scenarios of this issue, the major one was that the upgrade operation has been added two new boot images wihtout our awareing, with different ID, without any necessary settings like "Deploy this boot image from the PXE-Enabled distribution point". By the way, according to my internal, they are corrupted and following these issues you can realize that it's stopping you from running task sequences and working with boot images. According to Google results, you might re-install the WSUS, DP, MP, made many changes which aren't needed really. I do suggest you verify everything, go over the DHCP options, DP, Task Sequence, MP, PXE. In order to solve this, you should only re-create the boot images from the beginning for  x64 & x86 architectures, Don't forget to deploy both even if only one is needed The tricky thing is that you can't create new Boot image without MDT integration, and I guess that you are trying to upload the "WIN file" from Windows ISO and it still doesn't work, therefore the operation you should do is the download MDT integration and integrate it into your SCCM.
  • don't forget, after recreating the new boot images, make sure the TS uses the correct boot image, distribute content, update DP's, Deploy this boot image from the PXE-Enabled distribution point, drivers and centra and centra.
You can download this from the following URL: https://technet.microsoft.com/en-us/windows/dn475741.aspx?f=255&MSPPError=-2147217396 The error: Image result for PXE error 0xc0000098    

Kernel Migrator for Exchange Product Review

$
0
0

Kernel Migrator for Exchange Product Review 

Exchange Migration is a complicated task when you are doing it manually.  However, you can simplify this migration using some specialized software. You just need to find the right tool and gain the expertise to use the tool. Many Exchange migration tools offer brilliant features that allow you to perform the migration with remarkable ease. Today I am writing about the Kernel Migrator for Exchange highlighting its important features.   

Kernel Migrator for Exchange  

Kernel Migrator for Exchange is designed to perform Exchange to Exchange, Exchange to Office 365, and Office 365 to Office 365 migrations. Before proceeding with my review on Kernel Migrator for Exchange, I just would like to mention some migration problems a Kernel Migrator for Exchange claims to solve: 
  • Hassle-free migration without errors and disruptions. 
  • Performs migration irrespective of the version and the deployment type of Exchange Server 
  • Better than the manual migration methods as it has better management features 
  • Not affected by shortage of server resources (as it can use the resources of network computers). 
  • No complexities involved - makes migration simple and easy. 
   Step1. Pre- Migration Analysis  A pre-migration analysis will help you calculate the time taken by the tool to migrate the mailboxes or public folder data from the source to the destination. For this, you just need to provide the network speed and the number of additional computers (agents) you are going to use for the migration. After the analysis, you get will get a pre-migration analysis report.    Step2. Agent Configuration  In many cases, the migration process slows down because of low server resources. The Kernel Migrator helps to solve this issue by sharing the migration load with the network computers by configuring them as agents. You can add network computers as agents in different ways -Manually, from Active Directory, by searching for network computers, or using a CSV file.      Step3. Mailbox Configuration  This mailbox configuration step is the process of creating and migrating source mailbox and public folders in target Exchange server. Configuring mailbox is like creating a two-way trust while migrating and permission that a user is having source Exchange server and migrating to target Exchange server. By this process you can map your source Exchange mailbox with target Exchange mailbox. This step also helps you to create a mapping between sources and target Exchange mailbox.  It's not just mailboxes and public folders, their permissions and limits also can be migrated using Kernel Migrator for Exchange.       Step4. GAL Synchronization  GAL Synchronization is the process of updating or modifying Global Address List of the source, target, or both the source & target in accordance with the changes in the source or target GAL. Using Kernel Migrator for Exchange, one can directly synchronize your address list completely or partially from source to target, target to source, or both the ways. This helps in the successful transition from the old Exchange environment to the new one.    
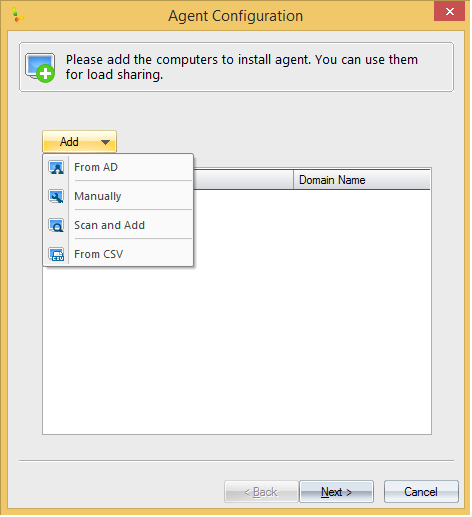
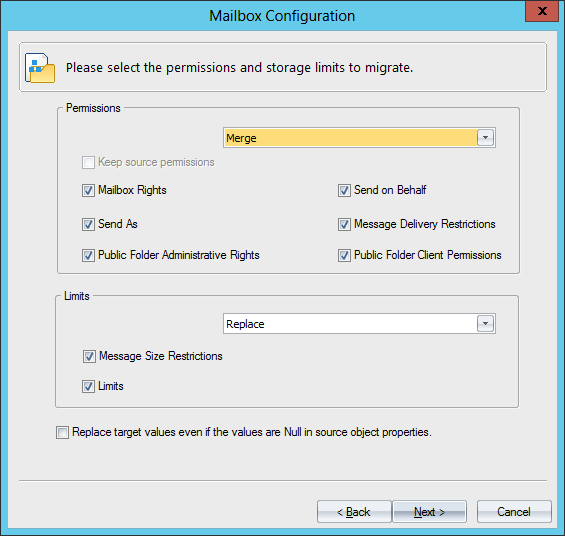
Step5. Migrating mailboxes and public folders  The migration process in Kernel Migrator for Exchange is straightforward. Basically, it involves the creation of a project followed by the creation of jobs for the migration of mailboxes and public folders. The entire process is simple and easy to execute. I am just mentioning the steps to give you the idea about the process to follow:   1) Launch Kernel Migrator for Exchange and click Add Project.      2) In the Add Project window, mention the name of the project. You can add all the migration jobs to this project for simplicity.   

   3) Now click Add Job; in the Add Job for Mailbox dialogue box, select the project name and enter a name for the Job. The creation of jobs simplifies the migration process. You can create multiple jobs at a time.    
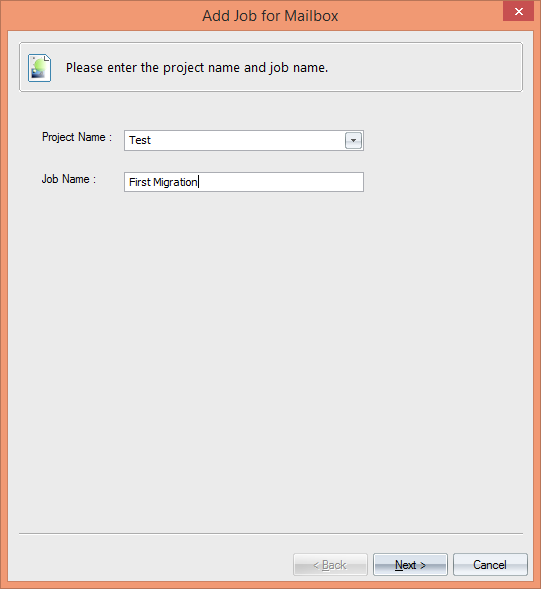
4) Now you have to provide the information about the source Exchange Server. You also, need to select a profile.    5) Now provide the details about the destination. The tool supports almost all types of Exchange/Office 365 migrations – same domain (single/multiple Exchange), different domain, Hosted Exchange, and Office 365.    
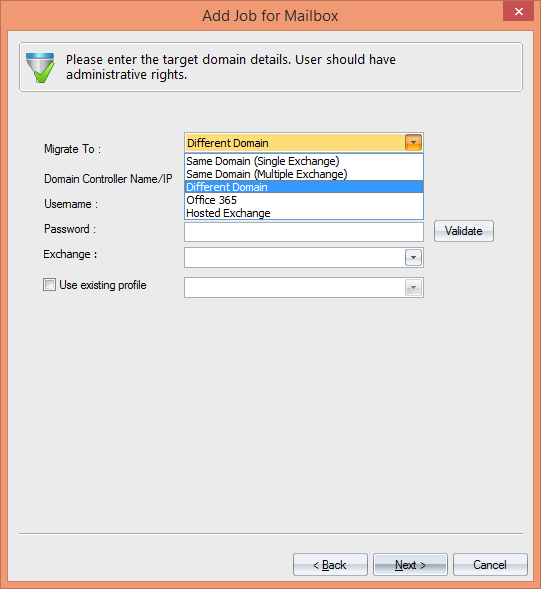
6) Apply filters to select the data to be migrated. You can include or exclude data from the source mailboxes by criteria like Message Classes, Date Ranger, and Folders.    
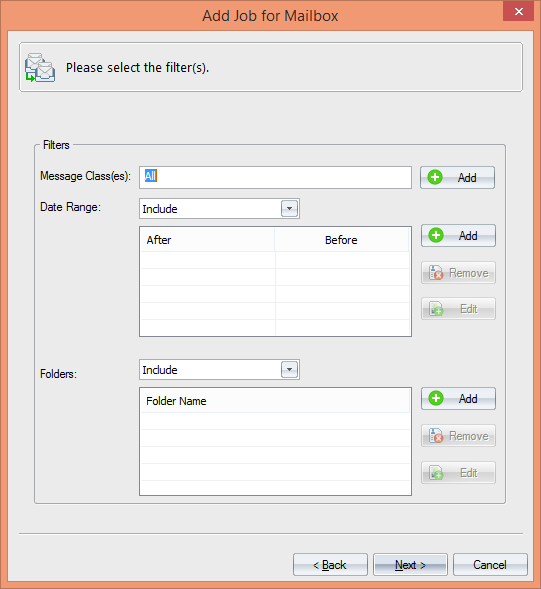
7) Now map the source Exchange mailboxes with target Exchange mailboxes (you have the option for automatic mapping and manual mapping).    8) Now select the required options for bad items and mailbox synchronization.    
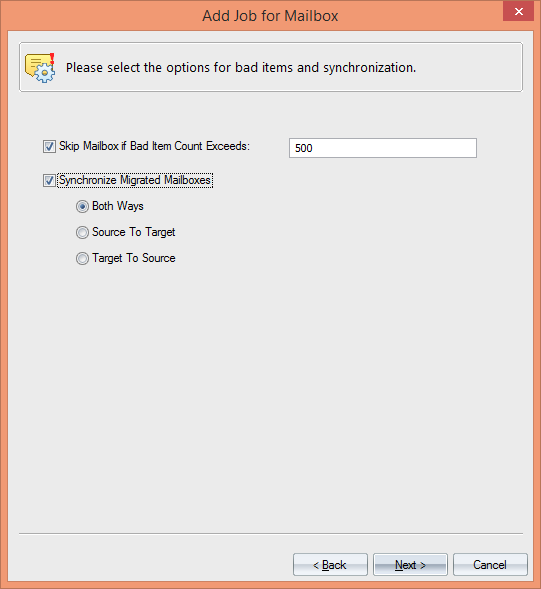
9) Provide the required notification settings if you have not configured it earlier. This option helps you get notifications at the important stages of the migration.  
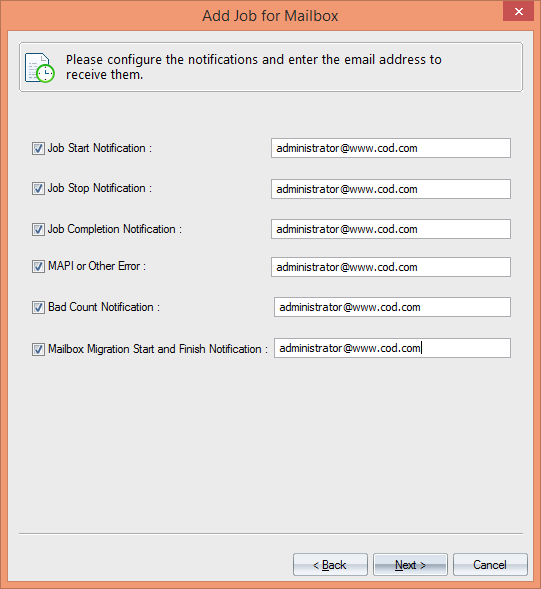
10) In this step, you can select the hours for the execution of the migration job. With this option, you have the perfect control over the execution time.  
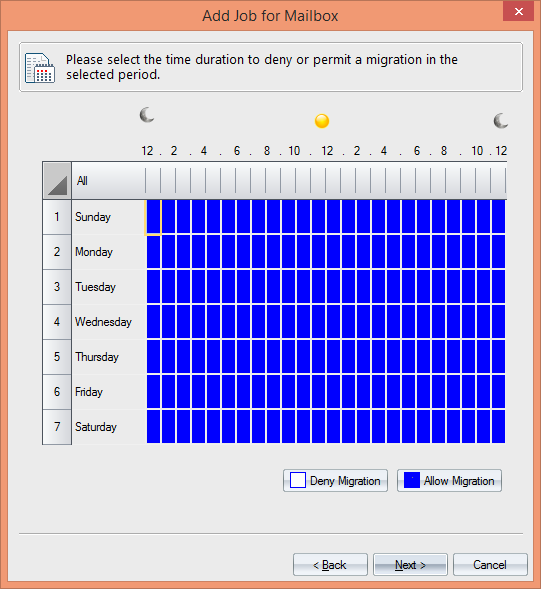
11) Now you can run the migration job immediately or schedule it for a future time. Also, you can delegate rights to access the Report Console (to view web-based migration report).  
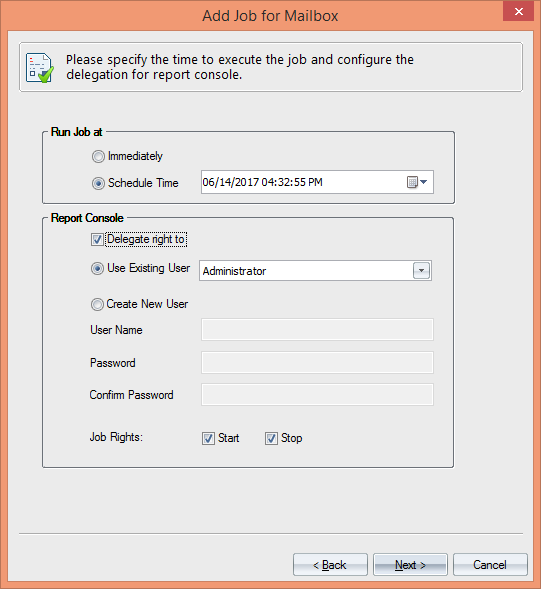
12) After the creation of the migration job, you will get a summary of the all the settings you have configured. Just review the settings and finish the job creation process. You can manage this job from the Report Console.    
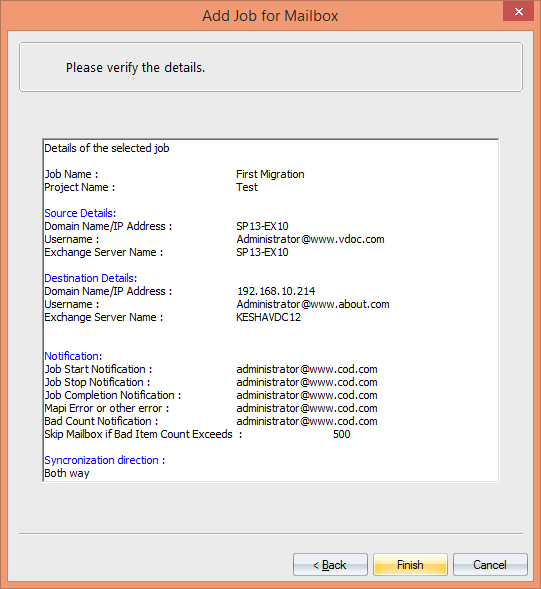
After the creation of mailbox migration job, you can create a migration job for public folders too. The process is somewhat similar.  Step6. Migrate Outlook Rules & Permissions  Kernel Migrator for Exchange helps to migrate Outlook rules and folder permissions too. For creating your rules and permission, you have to click on Tool then choose Outlook Rules and Permission and follow the instruction.      Step7. Profile Manager  In profile manager, you can update Outlook profiles of those mailboxes which are migrated from source Exchange to target Exchange. Through this step, you can create, edit, clean and undo your Outlook Profile.  Kernel Migrator for Exchange, with the help of the Group Policy Management Console, helps you update the Outlook profiles after the Exchange migration. The profiles can be updated in the same domain, different domain, and Office 365.  Kernel Migrator for Exchange, with the help of the Group Policy Management Console, helps you update the Outlook profiles after the Exchange migration. The profiles can be updated in the same domain, different domain, and Office 365.      The features I liked about this tool  You might have become familiar with the important features of the tool as we were going through the tasks that can be accomplished using this tool. Now, let me list a few features I liked: 
  • Pre-Migration Analysis that helps in calculating the time required for the migration. 
  • Sharing of migration load with the network computers by adding them as agents. 
  • Performs cross-forest migration, i.e., migration Exchange data in a cross-forest environment. 
  • Migrate public folders from one version of Exchange server to another version of Exchange server. 
  • Allows manual as well as automatic mapping to map source Exchange mailboxes with the target Exchange mailboxes. 
  • Enabled with migration schedule feature to let you schedule the Exchange migration job. 
Final words  My experience with this tool is excellent.  I would say that this tool is perfect for performing migration of Exchange and Office 365 migrations. One can get full control over Exchange migration using this tool This tool has many excellent features which have the potential to ease the migration tasks..  Along with that this is an easy to use tool too.  Summary  Organizations may face many issues during an Exchange migration. Kernel Migrator for Exchange is an answer to many of these issues. This tool simplifies the entire migration process by executing various tasks as jobs. Also, it has features for pre-migration analysis, migration load sharing, Outlook profile update, etc.   https://www.kerneldatarecovery.com/exchange-migrator/

Office 365 Migration options

$
0
0

Office 365 Migration options:

Hey guys, hope you are doing well, this article going to be interesting! Long time I wanted to introduce you the Office 365 migration options, Recently, I had many Exchange and Office 365 migration projects to complete, a roughly 3-4 project that I have to manage and lead, each one is different and more challenged, I really love doing this type of project!!! it requires preparation, design, implementation and project manager skills, therefore I would like to talk little about them and show you which migration options do we can initiate using Office 365 migration built-in options.

There have four migration options:

  • Remote move migration (supported by Exchange Server 2010 and later versions)
  • Staged migration (supported by Exchange Server 2003 and Exchange Server 2007 only)
  • Cutover migration (supported by Exchange Server 2003 and later versions)
  • IMAP migration (supported by Exchange and other email systems)

I want to concentrate on 3 major migration options:

  • Remote move migration (supported by Exchange Server 2010 and later versions)
  • Cutover migration (supported by Exchange Server 2003 and later versions)
  • IMAP migration (supported by Exchange and other email systems)
As we usually saying, "let’s talk business and touching them" Remote move migration (supported by Exchange Server 2010 and later versions): This mode allows us to migrate on-premises Exchange mailboxes to Office 365 and work at the same time on both sides. You can still work in the on-premises Exchange and receives emails, you can migrate mailboxes to office 365 and receives emails over there as well ,this method is the preferred to an organization that planning to move into office 365 services, Because you can do it in your leisure time and according to selection, without pressure, try to think about it, you decide which mailbox to migrate or not. Usually, we migrate about 10-20 mailboxes at the same time and as soon as the migrate finish the user gets a message that the "The Microsoft Exchange Administrator has made a change that requires you quit and restart Outlook" and you have to re-open the outlook and then the user should enter his credential which is must be matching to Office 365 UPN. What are the prerequires and important points to work in the Hybrid mode?
  • Make sure you have a trusted certificate, not from your CA, you should purchase - Make sure Autodiscover URL is included your certificate’s URL
  • Make sure your Autodiscover and you exchange records are published over Wide World DNS and points to Exchange.
  • If the exchange's name like (pelegit.local), you have to change Exchange URL’s that users will authenticate with Exchange/EWS services externally and then the users won’t get certificate warning like this:

  • If your UPN is different than the domain you added to office 365 please open "Active Directory Trust and Domain" and add the correct UPN.
  • You should change the UPN to the intended mailboxes that supposed to be migrated to Office 365:

  • If your SMTP address contains like “Meirp@pelegit.local” you have to remove it and also to remove the domain from "Email Address Policy": You also can check the "ProxyAddresses attribute" in the "ADSIEDIT" and check that there is no wrong SMTP address.

  • You also can uncheck the "V" option of “Automatically update e-mail address based on e-mail address policy” per a mailbox, or run this command using "Exchange PowerShell" and it unchecks the checkbox from all mailboxes. Get-Mailbox | Set-mailbox -EmailAddressPolicyEnabled $false
  • Make sure you are not syncing the wrong SMTP address, for example if your domain UPN is Meirp@Pelegit.local as you can realize that this domain isn’t valid in  the "Accepted Domain" on Office 365 ,thereby you must remove irrelevant SMTP address from all mailboxes, you can’t sync unexciting SMTP that isn’t valid in your accepted domain, I on purpose emphasize it because many migrations failed due to this issue.
  • How to remove wrong (%UserName%@Pelegit.local) SMTP address from all mailboxes:
    $users = Get-Mailbox -ResultSize unlimited
    foreach ($user in $users) {
    
        $email = (Get-Mailbox $user.alias).EmailAddresses | Where-Object {$_.ProxyAddressString -like '*pelegit.local'}
    Set-Mailbox $user.alias -EmailAddresses @{remove="$($email.smtpaddress)"} }
  • Add domains to Office 365 and don’t change AutoDiscover and MX records yet - Just verification process.
  • Enable office 365 trial license from licenses – you may wait up to an hour that all Admin center appears.
  • As soon as you finish with your On-premise prerequires you can download the Download the AD Connect from the following URL: (SBS2011, Windows Server 2008, Windows Server 2008 R2, Windows Server 2012, Windows Server 2012 R2, Windows Server 2016) -- https://www.microsoft.com/en-us/download/confirmation.aspx?id=47594.
  • Use of "Global Administrator" credential in order to connect to office 365.
  • Sync the contacts, group, distributions groups.
  • Before installing the Hybrid configuration you should verify that your exchange is ready for migration process by check that "MRSH service" is up and check the following points:
  • Check the MRSHealth using the following command: "Test-MRSHealth"
  • Make sure the MSRProxy is enabled using the following PowerShell on Exchange Shell:
    Set-WebServicesVirtualDirectory -Identity "EWS (Default Web Site)" -MRSProxyEnabled $true -MRSProxyMaxConnections 50
  • Make sure the Basic Authentication is enabled:
  • Open the IIS and open the “EWS” folder and make sure the "Basic Authentication" is enabled
  • Make sure you are able to access the following URL Externally https://mail.xxx.co.il/ews/mrsproxy.svc
  • Go to Exchange Management under Admin Center and click on Hybrid button
  • Using the End-point you can see the on-premises environment data.
New Hybrid configuration wizard prompted - Ensure the A/V is not blocking the wizard, otherwise, exclude some sources. - Make sure the AD connect and Hybrid configuration is opening to MS service using 443 and 80. Running the hybrid wizard, it is not complicated at all, just make sure you understand everything you are donning and don’t continue without understanding the small things.

Hybrid configuration creates the connectors (Send/Receive), certificates, email address policy, federation trust, hybrid configuration, organization relationship, onmicrosoft SMTP address and some settings that help to route the email and data to Send / Receive an email to office 365 in the hybrid mode.
  • Sending email to meirp@mscloudmailbox.com > MX  > SMG \PINAPP\Proof Point > Exchange > verifying if exist or not > forward email to Office
Exchange checks if this mailbox is existing in the on-premises environment or not, the mail goes to cloud according to "Routing E-mail Address":

How does migration process look like? Here is an example of a batch file with two mailboxes that migrating to Office 365:

If you see larger size than the original mailbox size -  don't worry it is ok, don’t work up, it is normal, migrate process adds some temporary data on the mailbox which helps them migrate mailbox.

Cutover migration (supported by Exchange Server 2003 and later versions):

This migration method is a common one as well, we migrate all mailboxes at once time, let me describe: When we have a small organization with 50 mailboxes which is small env, we can migrate all of the mailboxes from a source email system to Office 365 at one click, when you run this sync it doesn’t mean that you cutting over the mailboxes, you can re-run the delta whenever you want, just whenever you decide to change the DNS at the specific time, you can re-run the batch again as last incremental action and then change the MX and DNS record to point Microsoft services. You have to take into your consideration that after this process you have to reconnect all user's accounts to office 365 services and mobiles as well, their accounts were connecting to the old mail server. Important notes:
  • Microsoft allows you use this method only if your on-premises Exchange organization has fewer than 2,000 mailboxes.
  • Make sure the Outlook Anywhere is enabled.
  • You can’t use cutover migration when DirSync is enabled, you must stop the DirSync, therefore, you can create all source mailboxes as objects in your Active Directory, with the same UPN. and SMTP address and don’t run DirSync yet!
  • Exchange Online mailboxes are synchronized every 24 hours, or you can re-run it manually.
  • At the period of delta time, any deleted item in the on-premises environment will sync to exchange online as well.
  • You must create end-point with administer account that has full permissions to all mailboxes in the source environment
  • Autodiscover and you exchange records are required.
  • You have to add the Domain to office 365 accepted domains as well.
  • You have to verify that there is no any existing UPN, member, contact, groups, a user that already exists in Office 365, if it’s one of these objects existing, the migration process will be failed about existing object with the following error messages: Error: UnexpectedTargetRecipientTypeException: An unexpected recipient of type ‎'Mailbox‎' already exists in the target environment. Expected a recipient of type ‎'Group‎'.Error: MigrationProvisioningPermanentException: The name "PelegIT" is already being used. Please try another name. --> The name "Pelegit" is already being used. Please try another name.
  • Cutover Migration creates the mailboxes and users without licenses, at the end of the migration you should assign a license.
  • You can turn on DirSync again, afterward, you should see that your object syncs with your on-premises Active Directory.
  • Change DNS record to Office 365 and completed domain verification.
  • The annoying thing is the reconnect all mobiles and computer to office 365.
The cut-over migration runes in these steps: > Verification > Provisioning-Updating > Syncing Cutover example:

Do not forget deleting the batch at the end of the process. Guys please don't forget change DNS record and points them to Office 365.

IMAP migration (supported by Exchange and other email systems):

IMAP migration is another great way to migrate mailbox from mail system and you don’t have full permission for all mailboxes. IMAP migration allows us to migrate mailboxes using end user credential - email address and password. - You should create users in your office 365 and assign license before starting IMAP migration, regarding the password, it mustn’t be like source, you can to set a password to each user later on.
  • Only items in a user's inbox or other mail folders are migrated. Contacts, calendar items, or tasks aren't migrated.
  • The term for this is to create end-point as well as source exchange details.
  • You have to add your domain to Office 365.

You have to upload CSV file with the following columns > 'username, email address, and password', exactly the following structure:

After you completed the wizard with next button, you will be able to trace the migration progress:

The only problem I experience post this migration is that some irrelevant folders have created on the migrated mailbox:

However, it is migrating email items perfectly and you can use this option without purchasing any third-party software, it suites to migrate from email system which is based MS, although it supports exchanges server as well. By the way, you can do the same migration from the different location in Office 365 Admin center: Setup > Data Migration >

And here you have to provide "Administrator credential":

After that, just specify the user’s password in the source environment: - Clickable users are licensed users.

Also here you can resync the mailbox items whenever you want, like the cutover migration. The major difference is that here you must enter the user's source password. As soon as you complete the migration you, can change the DNS records and points them to Office 365 services. As you can see guys, we have different options to move into Office 365 service, a third-party solution can do the provide us the same solution (the common are MIGRATIONWIZ and kernel migrator). It was important to me sharing the migration options and enrich your knowledge with regards to office 365 migration subjects. I strongly recommend before initiating and moving to the office 365, check anything thoroughly, and don't miss small important notes, you simply can screw up the user's basic services due to the incorrect configuration, therefore, verify your autodiscovery is working well using this website: https://testconnectivity.microsoft.com/ For any question and further information please don't hesitate to leave a comment.    

Troubleshooting installing Domain Controller

$
0
0
Hey dear IT guys, I would like to share with you some good troubleshooting options you can make use when you trying to establish a new Active Directory and experience some issues. Please follow the logs and relevant events viewer for your troubleshooting. Server Manager or ADDSDeployment Windows PowerShell operations - %systemroot%\debug\dcpromoui.log - %systemroot%\debug\dcpromoui*.log Installation/Promotion of the domain controller - %systemroot%\debug\dcpromo.log - %systemroot%\debug\dcpromo*.log - Event viewer\Windows logs\System - Event viewer\Windows logs\Application - Event viewer\Applications and services logs\Directory Service - Event viewer\Applications and services logs\File Replication Service - Event viewer\Applications and services logs\DFS Replication Forest or domain upgrade - %systemroot%\debug\adprep\\adprep.log - %systemroot%\debug\adprep\\csv.log - %systemroot%\debug\adprep\\dspecup.log - %systemroot%\debug\adprep\\ldif.log* Server Manager ADDSDeployment Windows PowerShell deployment engine - Event viewer\Applications and services logs\Microsoft\Windows\DirectoryServices-Deployment\Operational Windows Servicing - %systemroot%\Logs\CBS\* - %systemroot%\servicing\sessions\sessions.xml - %systemroot%\winsxs\poqexec.log - %systemroot%\winsxs\pending.xml   Don't forget the built-in Active Directory tools like: Dcdiag, Repadmin which defiantly can assist in your troubleshooting.

Exchange 2013 DAG FailedAndSuspended

$
0
0
Hey guys,
This week I got a new customer with a funny interesting problem in his Exchange 2013 environments,
The new customer suffered from inactive & active availability with regards to Exchange services, some different IT integration company provided them support and maintenance, due to some internal reasons they have decided to join our IT integration and strengthen their productions services,the first task they ask me to check is the Exchange environments which was mostly down, unavailable and painful point.
I noticed that they have two Exchange servers that configured with DAG service and the witness server is the Active Directory which is OK.
They have three databases that should be synced to the second Exchange, While going over the DAG settings I have noticed that there are unclear events in the event viewer like the following one
 
The indexing of mailbox database XXX encountered an unexpected exception. Error details: Microsoft.Exchange.Search.Core.Abstraction.OperationFailedException: The component operation has failed. ---> Microsoft.Exchange.Search.Core.Abstraction.CatalogReseedException: The database '74xxxxx-485c-90cb-xxxxxxxxx(XXX)' needs to be crawled but is not mounted on the preferred active server. Requesting a reseed. at Microsoft.Exchange.Search.Engine.SearchFeedingController.PrepareToCrawl(NotificationsEventSourceInfo ciWatermarkInfo) at Microsoft.Exchange.Search.Engine.SearchFeedingController.DetermineFeederStateAndStartFeeders() at Microsoft.Exchange.Search.Engine.SearchFeedingController.InternalExecutionStart() at Microsoft.Exchange.Search.Core.Common.Executable.InternalExecutionStart(Object state) --- End of inner exception stack trace --- at Microsoft.Exchange.Search.Core.Common.Executable.EndExecute(IAsyncResult asyncResult) at Microsoft.Exchange.Search.Engine.SearchRootController.ExecuteComplete(IAsyncResult asyncResult)
  I noticed that on server A there are three disks, one of them was 450GB, I decided validating and verifying these settings on the second server and noticed that this DB isn't syncing to the second Exchange at all, the partition size is just 200GB which is lower then first Exchange, I don't know why they have configured it like this, in the Exchange Management I got "FailedAndSuspended" status on this DB, therefore I have run the reseeding process, yes it took some time, but once it finish the database syncs perfectly. I used on this cmdlet in order to verify the "Contentindexstatus":
Get-MailboxDatabaseCopyStatus * | ft -auto
 

SCCM The self signed certificate could not be created successfully

$
0
0
Hello guys, Just wondering if anyone has been encountering with the following error message when trying to apply some settings on distribution point in the SCCM:

 The self-signed certificate could not be created successfully

Solution 1

It freaks me out, didn't understand what wrong I am doing and After I restarted the machine twice I noticed that I am logging as temp user and SCCM can't apply this setting to this users. Please fix your profile and then try to set the configuration again it will work like charm.

Solution 2

Another solution that can help you is opening "C:Users<user>AppDataRoamingMicrosoftCrypt."  and delete any available key you found there.

Solution 3

The user you have installed the SCCM is a member of "domain guest" group, make sure you are not a member there! you also may get the following error in the event viewer: "Profile notification of event Create for component {2c86c843-77ae-4284-9722-27d65366543c} failed, error code is Not implemented ." I don't know what is the point of adding domain admin user to domain guest group, but I suppose to deal with this unexpected problems as well. Hope it was useful guys!

Download files from web using Powershell

$
0
0
Hey guys, Hope you are doing well! Today want to share with you a great method to download files from websites using Powershell, it could be very necessary when you have to download files constantly from a certain website. Example: $WebClient = New-Object System.Net.WebClient   $WebClient.DownloadFile("http://pelegit.co.il/wp-content/uploads/2016/06/Active-Directory_Hebrew_1.5V-3.pdf","C:\Pelegit.pdf")  

The e-mall address you entered couldn't be found Exchange

$
0
0
Hey there, Recently, I had to move my customer from Microsoft Exchange 2010 to office 365 services, due to financial circumstances the customer decided to return back to the on-premises environment. But while returning back we encounter in several unexpected issues with sending emails from some end-users. When a user tries to send an email to certain mailbox we receive the following error: The e-mail address you entered couldn't be found. Please check the recipient's e-mail address and try to resend the message. If the problem continues, please contact your helpdesk. 550 5.1.1 RESOLVER.ADR.ExRecipNotFound; not found ## I wasn't able to realize why it happens, after a strong headache, I noticed that the "LegacyExchangeDN" was wrong, and consequently would have to act accordingly :)
  1. Open the Active Directory and search the users you are looking for.
  2. Right Click and properties
  3. Attribute Editor
  4. find the "LegacyExchangeDN"
  5. in this attribute, I found this "IMCEAEX-_O=FIRST+20ORGANIZATION_OU=EXCHANGE+20ADMINISTRATIVE +20GROUP+20+28FYDIBOHF23SPDLT+29_CN=RECIPIENTS_CN=f3f12dk0kg044g4g0003fMeirp@pelegit.co.il"
As you can figure out the "CN" part is wrong, the solution is to delete\modify the RECIPIENTS_CN's value with the correct user's common name. In some cases, the LegacyExchangeDN value changed and you should create "X500 proxy address for the old LegacyExchangeDN" with the same CN you get in the NDR "f3f12dk0kg044g4g0003fMeirp@pelegit.co.il", otherwise, users receive endless NDR messages, it's up to you, you can add the X500 proxy address and in-parallel modify the old one and in fact you solve the issue thoroughly. For further information: https://support.microsoft.com/en-au/help/2807779/imceaex-non-delivery-report-when-you-send-email-messages-to-an-interna

Remove DAG Configuration Exchange 2013

$
0
0
Hello everyone, During the week I got a customer that asks for removing DAG configuration, they wanted to work just with a single an Exchange server. This process isn't so difficult but it requires a lot of concentration and focuses on the task, there is no place for mistakes here buddies. Therefore, in this article, I'm going to share the steps with you and show you how to do that safely and thoroughly In my scenario, I had two Exchange servers and a witness server. Alright, let's start with the removing process: First of all, you should check where the databases are located on and which server is the active one:

  We should move them to the relevant server using the following options:
  1. Using Powershell
Move-ActiveMailboxDatabase -Identity <DatabaseIdParameter> [-ActivateOnServer <MailboxServerIdParameter>] <COMMON PARAMETERS>
  1. Or you can use on Switchover:

Remove the copy from the irrelevant Exchange Server: - you will get a popup of removing this database from the unnecessary exchange server - you should confirm. - Make sure circular logging is not enabled in your databases.

Remove the Exchange servers from DAG group:

As soon as it's completed, you should delete the witness server as well and you have completed your task.

Microsoft Exchange Mailbox Replication service was unable to process a request

$
0
0
Hey there, Sometimes you could see the following Event in the Event Viewer on Exchange 2013, I don't like seeing these messages on some critical systems.

  You would check the MoveRequest and verify if any mailbox move request is stuck or export requests, import requests of migration batches, you should wait, remove, delete it up to you. You can fix this using the following cmdlet:
Remove-MoveRequest -MoveRequestQueue "DatabaseGuid" -MailboxGuid "RequestGuid"
Afterward, you shouldn't see that message on event viewer, unless you have another warning about the different mailbox.

This copy of Microsoft Office cannot be used on a computer running Terminal Services.

$
0
0
Hey there, During the week I have experienced a very annoying issue with Office 365 on terminal servers. You may get the following message while opening an office product on terminal services: This copy of Microsoft Office cannot be used on a computer running Terminal Services. To use Microsoft Office on a computer running Terminal Services, You must use a Volume License edition of Office.

although you have installed your Office according to Microsoft best practice with "SharedComputerLicense" value in the XML:
<Property Name="SharedComputerLicensing" Value="1" />
In order to verify if you have installed the correct version you should open the registry and find the following key: HKEY_LOCAL_MACHINE\SOFTWARE\Microsoft\Office\ClickToRun\Configuration.:

The only way I found to bypass this bug is applying the "Use shared computer activation" policy on the Group Policy: - You should install the Office 2016 ADMX files before applying this. Computer Configuration\Policies\Administrative Templates\Microsoft Office 2016 (Machine)\Licensing Settings.

 
Viewing all 717 articles
Browse latest View live